
Building the FL12
How to build a small rowboat from a professional design and apply the Federal and ABYC standards to the boat.
Click on Images for full size image.
I wanted to build a small boat, easy to row, easy to transport and easy to build. I had never tried the stitch and glue method. In my teens my father and I built an OK dinghy using traditional methods, and over the years I had worked on other traditionally built wooden boats, but I had never tried the stitch and glue method. After looking at various plans I chose a 12 foot stitch and glue boat called the FL12 that could be built out of four sheets of plywood, and a little scrap wood for odds and ends.
I purchased the plans for the FL12 from Bateau.com, now Boatbuilder Central, an on-line seller of easily built designs, primarily stitch and glue boats.They also sell all the materials needed to build the boat, but I purchased the materials from local sources.
I bought four sheets of plywood; two 3/8 inch exterior grade and two ¼ inch marine from a local lumber supply.
 |
Fig 1. The parts cut out of the four sheets of plywood. As per the plans I then laid out the patterns on the sheets of ply using a 4 foot straight edge rule and a tape. I used a ½ inch ID PVC pipe as a batten for curves. The plans include full size patterns but the designers warned that the patterns may be off in dimensions due to humidity or shrinkage, so following the detailed drawings I used the given dimensions to lay out the patterns. Although they say in the plan notes that a little slop is ok, I tried to get it as close as possible. Even so, when I put the boat together there were areas where it did not line up and adjustments had to be made. |
I then cut out the patterns with a circular saw. It is relatively easy to follow the curves, and little bit of slop is ok. However, here’s a warning. The plans said it was ok to go ahead and cut out the seat tops along with everything else. But I found that when it came time to put the seat tops in place they did not fit properly. Both the rear seat top and the center seat top were too short, and the forward seat top was too big. It’s easy to cut something down to size but difficult to make it bigger. So I would advise waiting to do the seat tops. Wait until you get to that point in assembling the boat. Then measure carefully for each seat top. Draw them on the plywood and cut them out. They will fit better. This would not have been a problem if the gap was 1/8 or even ¼ inch but the gap on the rear seat was at least 3/8 on each end and ½ inch on each end for the center seat. I had three or four six foot oak 1 X 6 planks from an old bed. I cut three of them into one inch strips. I then cut the strips into battens for the frames and the transom. These were glued to the frames with epoxy resin. I planned to use a small two hp outboard on this boat so I thought the 3/8 inch transom would not adequately support it. I cut out two pieces for the transom; one 3/8 inch and one ¼ inch to be glued together. I then cut out two squares five by five of 3/8 inch for backing to mount the outboard and glued these to the top of the transom at the centerline. Later on I also glued a piece of vinyl plastic to each side so the clamp for the outboard would not mar the wood. However, later use revealed that this did not work well as the epoxy does not adhere very well to the plastic and they kept coming off. I later replaced this with an aluminum piece that was bent into a U shape and fastened to the wood with screws. Since I had decided to open up the seat compartments, I used foam flotation rather than air chambers. I drew the sizes for hatches on each of the seats. But I decided not to put a hatch in the top of the middle seat. It would be the main seat for rowing so I wanted to leave it whole. I drew an opening in the rear middle seat frame instead, which I left open. Structurally it would still be as strong and would be easier than making a hatch. One flaw in the plans is they do not provide the builder with the maximum capacities required by the US Coast Guard. I calculated the boat’s maximum weight capacity, persons capacity in pounds, and number of persons, and flotation. I then calculated from those numbers how much flotation was required to make the boat float upright if it was swamped. The boat actually does not need much flotation but I added about 1 ½ cu feet to provide additional flotation and the ability to float upright. One common misconception among boat builders is that wood boats don’t need flotation. This is not necessarily true. It is much safer to do the calculations and determine if it does or does not. How to calculate Capacities and flotation. See also Go To Page 2 Calculating Capacities and Labels. |
|
 |
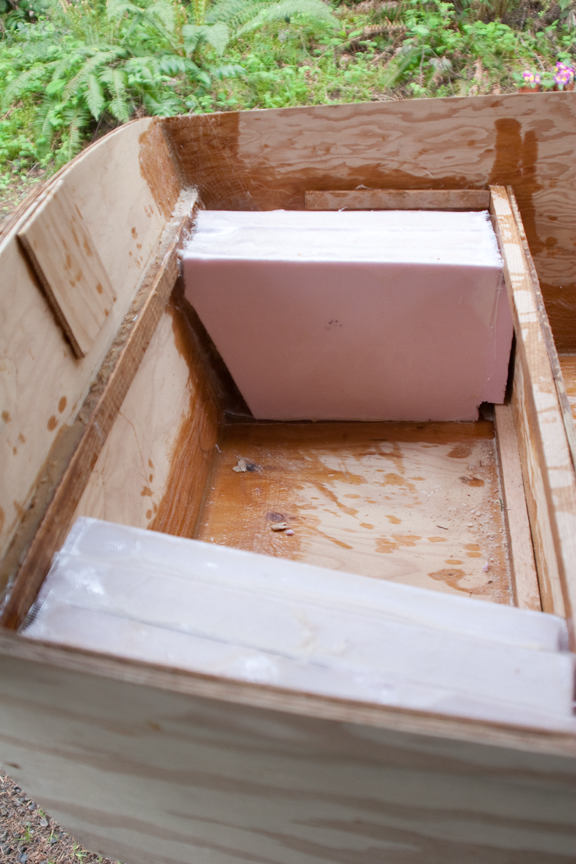
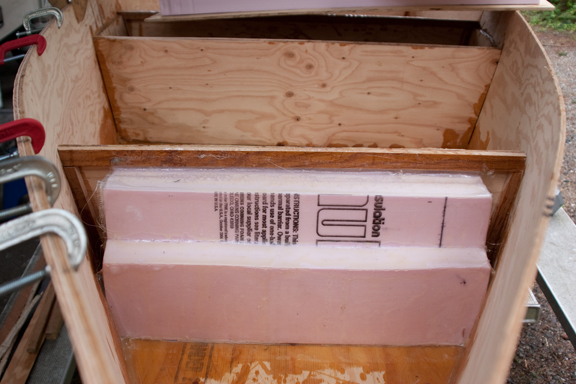
Fig 2. Foam for the mid seat. I went to a Home Depot and looked at insulation foam, most of which is two pound density foam. That is, one cubic foot weighs two pounds and supports 60.4 pounds of weight when submerged. They have mostly polystyrene foam, which is fine in this case, but if you are putting foam in a boat where it will be exposed to gasoline or other oils, or solvents then you should use polyurethane which will not be affected by gasoline. Styrofoam and other plystyrenes will dissolve. They had sheets of foam, two inches thick, by two feet wide and eight feet long. This is approximately 2 ¾ cubic feet. |
I divided it up into three portions. I needed some in the stern to float the engine, some in the middle to provide stability and some in the bow. I put about ¾ cu foot in the stern, split between the two corners, ¾ cubic foot in the bow, and the rest I glued to the bottom of the middle seat top. This last portion would probably never be submerged even if the boat filled with water, but if it did it would provide very good stability and keep the boat floating level. I glassed in the foam in the bow and the stern to keep the foam in place and so it would not be exposed to gasoline or oil. But I am getting ahead of myself. |
|
 |
Fig 3. A frame with battens glued on. I cut out battens for each frame and glued the battens to the frames with epoxy. I also glued together the two pieces of the transom, the transom batten and plates for outboard mount. I then assembled the sides together with the butt blocks. I was confused about how the butt blocks are oriented. It is not clear on the plans. But after studying the plans and construction notes I think I got it right. But I should have left about 5/8 inches of space at the bottom. |
 |
Fig 4. Butt blocks for the sides This allows space for the butt block that glues the bottom pieces together. Again this is not clear in the plan notes or on the plans. |
After everything set up I then put in the transom and stitched it to the sides. I then stitched the bow together. For stitching I used plastic wire tires. Mostly I used white or opaque ones but, I used a few black ones. This wasn’t a good idea as they show through the epoxy when you cut them off. So use clear, white or opaque. Then I tried to insert mid seat frames and the butt blocks on the sides broke. They were not strong enough to take the bend. I had made them using ¼ inch ply as specified in the plans. I should have used 3/8 inch. So, I made two new butt blocks and glued and clamped them directly over the broken ones doubling the thickness. |
|
 |
Fig 5. Midseat showing broken butt blocks. |
This time I inserted the middle seat frames first before putting the stern and bow together. Then I stitched on the transom and then stitched the bow together. I then measured and inserted the rear seat frame and the bow seat frame. Each frame was positioned by measuring using the dimensions from the plans and anchoring them with temporary screws to hold them in place. But, again I should have waited to make the seat tops because they were too wide (fore and aft) and had to be trimmed to the correct width. I then joined the bottom pieces with the butt block. After the bottom butt set up, I turned the boat over and fitted the bottom to the sides. There is a lot of overlap. The boat is at least an inch wider at the mid seat than the bottom piece is. So I took the mid seat frame out and removed about 1/8 inch off the ends of the frames. Even after doing that the distance between the sides was still wider than the bottom piece. I then stitched the bottom to the transom and sides at the transom and at the mid seat. I used duct tape on all seams to hold it all together. I should have used painter’s masking tape. The duct tape stuck to the epoxy filler after I filled the gaps and was difficult to get off in places. Being gray it showed through the epoxy. Masking tape is at least the same color as the wood filler and if it didn’t come off would not stand out. Then I turned the boat over to fill the seams with epoxy wood filler and fiberglassed the seams. |
|
 |
Fig 6. Taped seams First I glued all frames in. I had to trim the bow seat frame a bit on the right side to get a good fit. I used some scrap wood and clamps to hold bow seat frame in place. I put at least one screw in each frame to hold them in place. Overnight the tape let go and the bottom separated by at least ½ inch at the bow seat frame. I used some rope and boards to draw it back into place. And it seems to have adhered. |
Then I cut all the fiberglass tape for doing the inner seams. At his point the weather turned bad. Since I was doing this outside, as I had no shed or garage, I had to wait for the weather to improve. A few days later the weather improved. The temperature was in the 60’s and sunny |
|
 |
Fig 7. Improvising clamps Here is how I pulled the bottom at the bow together with the side pieces. I didn’t have any of the long extendable clamps so I had to make do with what I have, which is lumber and rope and smaller clamps. Actually in the photo the clamps are there just to keep the ropes from sliding forward. |
I placed two boards crosswise under the bottom and pulled them upwards to draw them together with the sides by twisting the rope. I repeated this at the transom to pull the bottom piece up to the bottom of the sides and transom. I started with very large gaps, maybe ½ inch all around. Now the largest gap was less than ¼ inch. Following the design instructions I mixed up a putty of epoxy and wood filler to about the consistency of peanut butter and filled the seams. Fiberglass tape was then laid on the inside of the seams. It went very well. My wife helped and did a great job. She’s very good at wetting out fiberglass. When doing the filling and fiberglass work, it is good to have a helper to make the job go easier and quicker. This way you don’t have to think as much about pot life, and the epoxy won’t set up before you get the glass on, wetted out and rolled. |
|
|
Content Continues After Ad |
|
 |
Fig 8 While waiting for the epoxy to cure I cut out some wood strips for the rails. After three or four hours I pulled off all the tape and removed the clamping boards and rope. There was one small hole that wasn’t filled at the rear seat frame, about a half inch long. I filled this in later when I did the glass work on the outside of the seams. |
 |
Fig 9 As previously mentioned I bought a 2’ X 8’ X 2” piece of polystyrene foam. I cut it into separate pieces and installed approximately 0.8 cubic feet under the rear seat in corners, 1 cubic foot under mid seat and 1 cubic foot under bow seat. I glassed the rear and bow foam blocks in. I did this for two reason, to keep water or gasoline (from the outboard) away from the foam, and to hold the foam in place. For the mid seat, I glued two 2 inch thick layers of the foam to bottom of the mid seat with epoxy. I also cut an opening in bow seat top for a hatch. I glued strips about two inches wide to the bottom of the seat to prevent hatch cover from falling through. Also instead of putting a protruding handle on the hatch cover I simply cut a one inch hole in the cover. I learned a lesson here. Every time someone sat on the bow hatch, ithe lid broke. I later replaced the seat top without the hatch.
|
 |
Fig 10 The boat bottom overlapped the side panels, so I trimmed it to fit. |
| Figs 11, 12, 13. Foam Flotation, stern, bow and mid seat. | |
 |
 |
 |
|
I also cut a small hatch in rear seat. I then glued rub rails to starboard side. I glued blocks to the inside of the bow compartment to support the forward seat. Here I learned a lesson. For small jobs requiring epoxy, I had purchased a System Three epoxy kit in two small bottles to be mixed 50-50. I used this to glue these blocks. On bare wood there was no problem, but on areas where there was already epoxy it did not stick. I had to sand down the epoxy to get rid of the amines that were preventing a bond between the two type of epoxy, even though I was using System Three Epoxy Resins throughout. The rear seat top did not sit level when I put it in place. I put some putty on rear seat support (on transom) to level it. The front seat was too wide so I shaved sides of front seat to fit better. I fastened the mid seat to frames with four brass screws rather than gluing it so if necessary it can be removed. I will do the same with the rear seat but I glassed in the front seat top. I glued the rub rail to port side. I glued one block to hold front seat that had fallen off. I glued a small block to bottom of front seat compartment and another on the bottom of the cover for the cord to hold the cover in place. (later eliminated by eliminating the hatch) The rear seat had large gaps at both ends. I glued trim strips to make up the gaps. I then cut out hatch cover and glued hatch support to bottom of seat cover. I screwed seat to frames so it could be removed at some point in the future. I trimmed the front seat top, made a small triangular piece to go on top, glued top onto frame and blocks. I cut an opening in rear mid seat frame to use the seat as storage rather than a hatch. (Again that was a mistake and I later eliminated the hatch.) Fig 14. Hatches and openings. |
|
 |
|
I then turned boat over. I ground down all chines, corners, bow, transom and filled any gaps with epoxy putty. I coated all edges with resin and put on glass tape. I coated tape with resin. I ran out of resin so I put plastic sheet over the boat. 5/15. Bought more resin and hardener and coated entire outside of hull. I then covered the bottom of the hull with plastic as described in the build notes. This did not work out well When I took the plastic off the surface was very uneven. I do not like what the plastic does. It does not present a smooth surface. I sanded transom. I removed most rough spots. Trimmed off the worst spots of glass sticking out, with a knife. I sanded the transom with a sanding disk. My wife sanded one side with an orbital sander (vibrating). |
|
 |
Fig 15. Coating of QuickFill I coated the boat with Quickfair. It looks good but it will need light sanding. Put some quick fair on bow. Should have sanded down rough spots first. Does not look as good as where I sanded first. |
I did not yet make a skeg. The board I was going to use has a curve in it and it is too short. The board from the bed is too short and not wide enough. I will look at what is left of the bed in storage. I am trying to straighten out the oak board. We sanded one side and applied QuickFair. Sanded down the bow area. Quick fair applies much smoother if most of the rough spots are sanded off first. We finished sanding and filling exterior. It looks pretty good. My wife did a lot of the sanding and applying the fill. I drilled a hole in the stem for a bow eye. I fitted a bow eye but I don’t like how it looks so I took it out and went with just putting a rope through the hole and knotting the end. Trimmed the front seat edge to align with frame. Trimmed the mid seat top to align with box. Sanded down edges of seats. Planed top of frame battens on mid seat down to edge of plywood. Filled all seams around frames and seats with wood putty. Learned that a foam pad brush works best for smoothing the putty. My wife helped with sanding and filling. It took about 5 days to completely sand the interior of the boat with 60 grit paper. I then gave the interior a complete coat of epoxy. I then lightly sanded the entire interior (not inside seats) with 150 grit and coated with second layer of epoxy. At this point the interior was essentially done. I made backing blocks for oarlocks. I made these out of African mahogany that I had scavenged form a bed made in the 1840’s. This is truly beautiful deep red wood. I glued them to gunwales with epoxy. I put them on the inside of the boat but later after having rowed the boat I moved these to the outside of the gunwales to separate the oars by a few more inches. I bought some 7 foot oars and installed oarlock sockets and oar locks. The length of the oars should be about twice the width of the boat which, would have been 8 feet, but the closest I could find ready made were 7 foot. They feel right when on the boat. |
|
 |
Fig 16. Skeg I made the skeg out of white oak and glued it to the hull. I have been told white oak does not glue well so I am waiting to see how well this works out. This oak was also from the bed. There were three oak cross pieces that the mattress sat on. |
I planed the top (bottom?) of skeg and sanded it smooth. A nice trick when coating the skeg to keep the epoxy from running onto the hull, is to put masking tape around the skeg so I laid tape down to catch epoxy. I liberally coated the skeg with epoxy. After about three hours removed tape. I did some more sanding on the bottom and sides. I sanded through the epoxy in a couple of spots and had to re coated with epoxy. Finally I put on a primer coat. Looks good. Covered very well. Did not fill much. It used only one quart. I painted the outside of the hull with medium blue Interlux Brightside Polyurethane. It took about half a quart. I used a foam roller, which left lots of air bubbles so I had to go over the whole boat with a brush to get rid of the bubbles. |
|
 |
Fig 17. Paint job I then made HIN labels and a laminated capacity label. I put the labels on with epoxy resin. Total cost was about $600.00. The most expensive material was the epoxy.
|
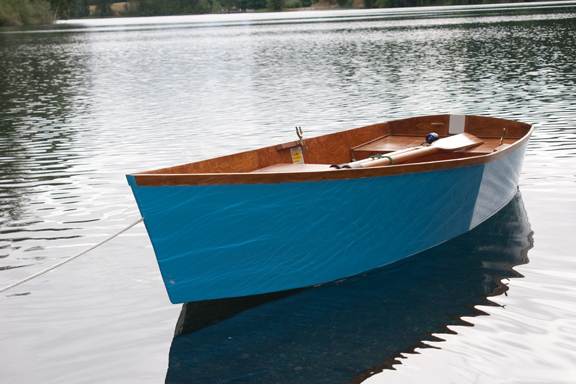 |
Fig 18. July 5, 2008: The launching. She floats beautifully. We spent about four hours on American lake. We rowed it and motored with a two horsepower outboard. |
Lessons learned: The mid seat is too high. The oars hit my knees on the back stroke and I am not that tall. I had to move the oar locks farther outboard and about two inches farther aft. Alternatively, lower the seat. The battens holding up the hatches came off when the hatch was sat on. They had to be made wider and re-glued. They were eventually eliminated. Plastic does not adhere well to epoxy. Take your time. Haste results in making parts that don't fit. Use a measuring cup or one of the devices sold by the epoxy makers to measure the two part resins. Measuring by weight is not accurate. Use volume. Use disposable cups or pots. It's wasteful but much easier to deal with. Wear rubber gloves. Wear clothes you would be willing to throw away at the end of the project. You WILL get resin on your clothes. It is inevitable. The use of a large plastic sheet to get a smooth coat (what the designer called poor man's pre-preg) did not work well for me. Maybe I did it wrong. I think this is a great way to build a boat for an amateur or for someone wanting to put together a boat quickly and relatively cheaply. But my feelings about glassing over wood still leaves questions in my mind. How long will it last? I think I still prefer traditional methods despite the fact that they take more skill and take longer. To me they produce a real work of art. However, this can be done with hand tools and does not require any special jigs or molds. I built it on a picnic table in an RV park. The only power tools I used were a circular saw, a power drill, and several orbital sanders. 2023 Update: Since 2011 I have made some changes. The hatches in the front seat and the rear seat did not work out. I have removed them and closed off those compartments. They are now only for flotation. I added some trim pieces on the edges of the seats using African Mahogany from our old bed. I also put some triangular pieces in the corners at the transom and at the bow made from the same wood. It gives the boat a completed look and provides a spot to tie a line on the stern. The bright interior was difficult to maintain. Every year I had to redo the epoxy coating because of UV radiation deteriorating the epoxy. So I painted the interior. It's easier to maintain. An annual painting of the floor is really all that needs to be done. I touched up the sides and seats annually but only repainted the entire interior about every five years. We used the boat a lot on the lake for rowing and fishing. Occasionally used the O/B. Sold the O/B in 2021. We really did not need it. I added another Hull Id number on an aluminum plate on the transom in case someone accidentally covers up the HIN embedded in the epoxy. Some how water gets into the rear seat compartment, but only if I leave the boat upright and it rains. I have tried recoating the seams but have not stopped the leak. I have drilled a small hole in the top of the seat so when I turn the boat over the water drains out. The solution is to always store the boat upside down. Go To Page 2 Calculating Capacities and Labels.
|
|
|
|
|
This Web site may contain copyrighted material the use of which has not always been specifically authorized by the copyright owner. I am making such material available in my efforts to advance understanding of educational, economic, and scientific issues, etc. I believe this constitutes a "fair use" of any such copyrighted material as provided for in section 107 of the US Copyright Law. In accordance with Title 17 U.S.C. Section 107, the material on this Web site is distributed without profit to those who have expressed a prior interest in receiving the included information for nonprofit educational purposes. For more information see: www.law.cornell.edu/uscode/17/107.shtml. If you wish to use copyrighted material from this Web site for purposes of your own that go beyond "fair use", you must obtain permission from the copyright owner. |