
Rebirth of a 1972 18' Sea Ray 190 I/O Pg 1
Page 1, 2, 3, 4, 5, 6
I purchased a 1972 Sea Ray 190, 18 foot (5.5m) I/O with a Mercruiser 165. It was dirt cheap and was on a very good EZ Loader trailer but the interior of the boat needed restoring. My intent was to get a boat I could restore to a serviceable condition, and have something I could use on lakes, and big enough to take out on bigger waters like Puget Sound. But mainly it was to be a learning experience. I hoped to learn a lot and put much of my engineering education to a practical application.
The boat:
 |
 |
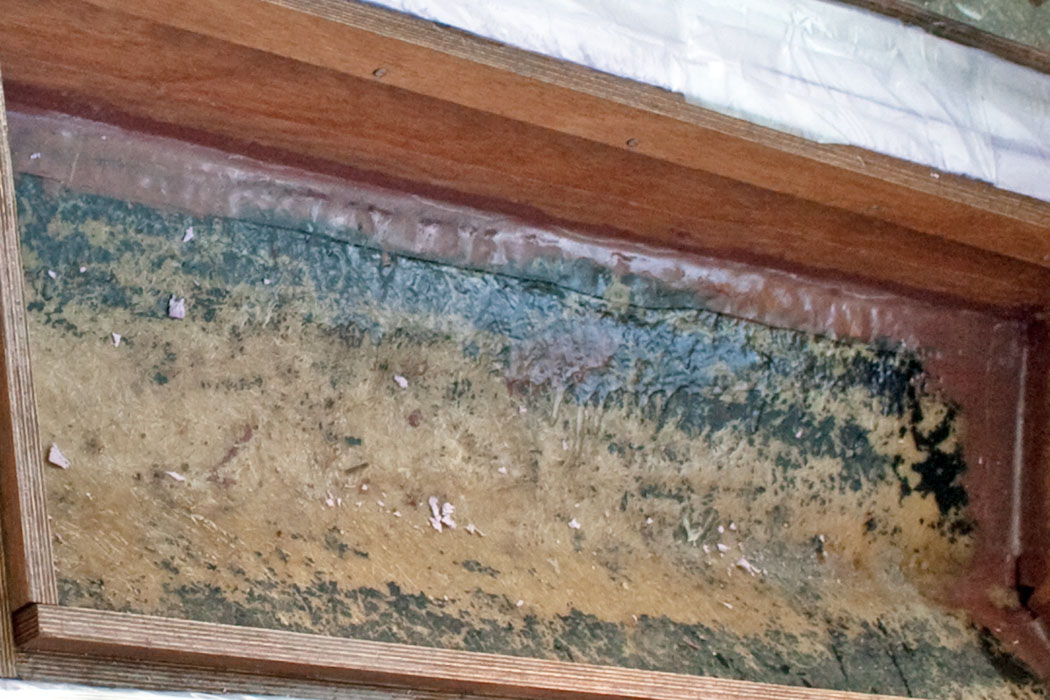
Although it looked pretty good from the outside the interior of the boat was truly disgusting, completely wrecked by water. So, it was obvious that most of the interior would have to be removed and replaced. The photographs below show the condition.
 |
 |
The first thing I did was to make a list of everything I thought I needed to do. This list would get longer as I took things out but here is most of it:
Remove and replace all the seats.
Remove and rebuild the sole, the structure under the sole, and flotation foam.
Replace the carpet.
Replace the navigation lights.
Rewire the lights
Rewire most of the boat.
Remove and replace the fuel hose and fittings
Remove the fuel tank, clean and test, and replace the fuel tank gauge sensor.
Replace the start switch (the keys were missing).
Remove and lubricate the throttle control
Rebuild the engine box (I only had to replace the vinyl, and make a new top for it)
Replace the following on the engine: Alternator, distributor, filters, hoses, some wiring, plugs, ignition wiring.
I had thought I might restore it to it's original condition, but after some research and thought, I decide to upgrade to make it conform with current USCG and ABYC standards.
The first task was to get all the old junk out, removing the rotten seats and carpet. Then I could get at the sole and structure. But I did not want to just start ripping things out. I wanted to take a measured approach, taking it apart a bit at a time to determine the extent of that damage. Of course the first thing to come out was the seats. You can see from the photos that the lounge seats and rear seats were beyond fixing, so they went in the trash, and I ordered new lounge seats. I built new rear seats and had new cushions made. Below are the rear seats, before and after.
 |
 |
 |
 |
Below is the structure after I removed the sole back to good wood, but before removing the old foam. The foam had some water saturation but much of it was ok. The wood stringers were totally rotted and the wood sole was rotted back about 6 inches (15 cm) from the edge of the ski locker. First I carefully measured everything, made sketches and took lots of photos. I cut away the wood sole for about seven inches (17.8 cm) in from the locker, forward to the bulkhead and aft to the engine bulkhead. I removed the foam from this area. The foam had water in it and some gasoline. The fuel tank must have leaked and been replaced. The current tank is a Tempo roto-molded Polyethylene tank. I also removed about a cubic foot of foam (0.03 cu. m)under the foredeck that smelled badly of gasoline.
| |
 |
 |
This process sounds much simpler than it was. It required a lot of cutting with a reciprocating saw, a circular saw, and a large knife, a pry bar and even a hatchet. I took out at least four 13 gallon (50 L) trash bags of foam and wood.
Content Continues After Ad
I devised a plan for replacing the sole and stringers;
 |
 |
 |
 |
The material is 3/4" (18mm) meranti marine plywood for the stringers and transverse pieces. The stringers are coated with Clear Penetrating Epoxy Sealer (CPES) and then bedded in epoxy putty, and lastly sheathed in fiberglass with epoxy resin. The old existing stringers, where exposed, are saturated with CPES. The cross pieces are also sealed with CPES and sheathed in fiberglass and epoxy.The sole is 1/2" (12mm) meranti marine plywood and is sealed in CPES, and sheathed on both sides with fiberglass and epoxy resin. The middle photo above shows the epoxy and glass attaching the stringers to the hull and sealing off the wood from water intrusion.
The foam is polystyrene sheet foam. It comes in 2 inch ( 5 cm) thick sheets 8 feet (2.4 meter) by 2 feet (0.6 meter). You can buy it at any home improvement store. This is not styrofoam. Styrofoam is a trademarked name. This is polystyrene foam used for insulation. It has a much smaller cell structure and is not as prone to breaking into little pieces. Styrene foam is affected by chemicals, such as gasoline and oil, so the foam will be bagged in polyvinyl plastic sheeting and sealed in. This way no water or other liquids should be able to attack the foam.
 |
 |
 |
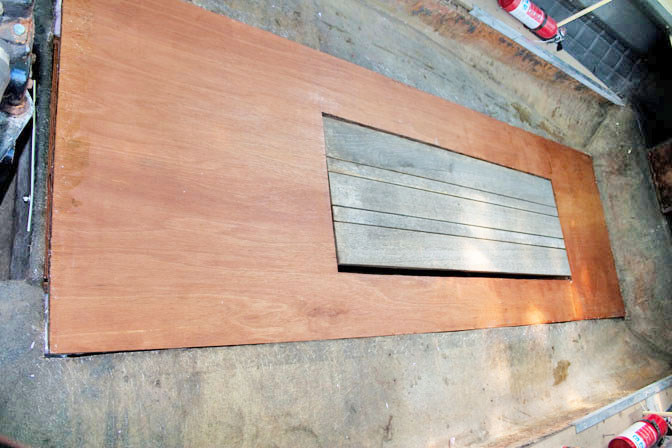 |
This shows the foam bagged in plastic, except for a small portion that is immediately under the deck, and only two inches thick. The last photo shows the deck in place, but it has not been fastened down yet. It will be fastened with two inch (5 cm) stainless steel screws to the stringers, glassed over, and the edges will be connected to the existing sole with four inch (10 cm) wide glass tape. Then the sole will be covered with carpet.
 |
 |
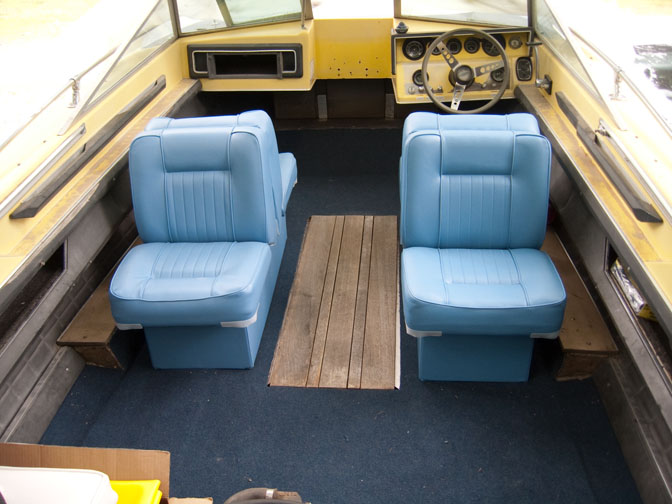 |
Here it is with the carpet laid, and then with the lounge seats installed. The structure of the seats is high density plastic, so they cannot rot. They are made by WISE.
The carpet is indoor/outdoor/marine carpet from Home Depot.
Before installing the seats I reinstalled the fuel tank and hooked up the fuel system. See page two.
|
|
|
This Web site may contain copyrighted material the use of which has not always been specifically authorized by the copyright owner. I am making such material available in my efforts to advance understanding of educational, economic, and scientific issues, etc. I believe this constitutes a "fair use" of any such copyrighted material as provided for in section 107 of the US Copyright Law. In accordance with Title 17 U.S.C. Section 107, the material on this Web site is distributed without profit to those who have expressed a prior interest in receiving the included information for nonprofit educational purposes. For more information see: www.law.cornell.edu/uscode/17/107.shtml. If you wish to use copyrighted material from this Web site for purposes of your own that go beyond "fair use", you must obtain permission from the copyright owner. |